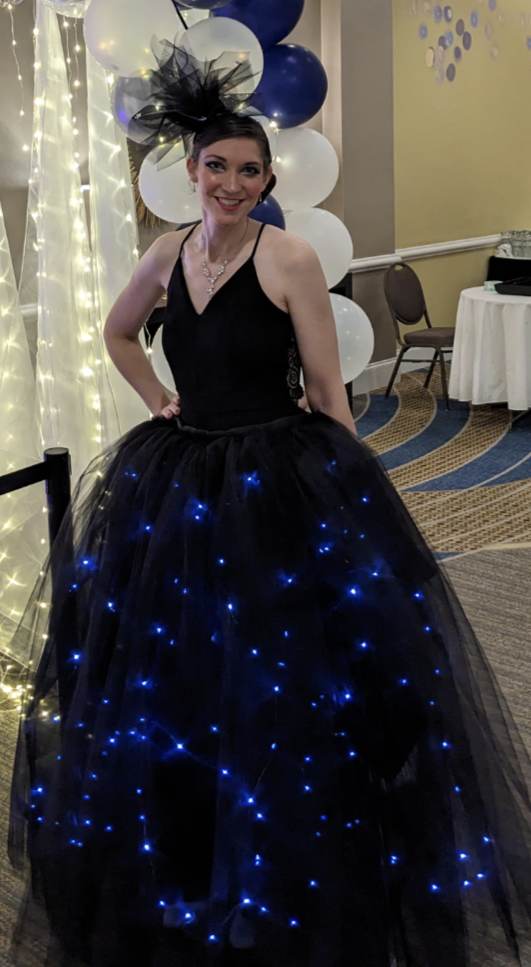
Light Up Twinkling Prom Dress DIY
You may have seen the fiber optic fabric gowns. Well, at hundreds of dollars a yard, who can afford that? Not me. So, when I heard that the local Mom Prom was having a Under the Stars theme, I thought twinkling Fairy Lights to emulate the night sky. Lets get to it.
- Black Jumpsuit (mine was thrifted from Goodwill)
- Several Yards of Shiny Nylon Black Tulle (will explain calculating yardage later)
- Several Yards of Black Scrubbie Mesh Netting (will explain calculating yardage later)
- Spool of Black Sewing Thread
- Large Sewing Needle
- Vinyl Tape Measure (to take waist and length measurements)
- 3 Sets of Remote Control Battery Powered Fairy Lights
- Sheet of Black Felt
- Spool of 3 Inch Black Grosgrain Ribbon (at least 3 yards long or more)
- Scissors
Step by Step:
Great, now I am singing the New Kids on the Block song. If you don't know it, I suggest finding it online. It's an oldie but a goodie. Anyway, back at it....
Calculate:
So I measured from where I wanted my skirt to sit on my waist down to the floor and then out about 6 inches from my feet. I wanted to make sure that it would be long enough for the poof that I was wanting to achieve and still be near the floor. You can always cut off length, you can't add it back. Lets call this measurement L for length.
I then took my around the waist measurement where I wanted it to sit around the waist. Lets call this measurement W for waist.
Tulle comes on bolts with a set width of fabric. For the fabric I wanted to buy and my W measurement, I determined that I would need 4 panels of gathered tulle to equal my W measurement.
I decided that I wanted 2 layers of Shiny Tulle and 2 layers of Scrubbie Tulle. The scrubbie is more stiff and has bigger holes. The stiffness gave me the puffiness I wanted and the larger holes gave me the ability to weave the fairy lights through the fabric.
On to calculating how much yardage of each I needed.
For the shiny tulle: {(L) x (4 panels) x (2 Layers)} / 36 inches = total yards
For scrubbie tulle: {(L) x (4 Panels) x (2 Layers) } / 36 inches = total yards
example: {42 inches x 4 x 2} / 36in = 9.3 yards
I suggest buying a little extra of the scrubbie mesh to make light pockets and a matching hair piece.
For the ribbon that tied around my waist, I made sure that the spool length was long enough to wrap around my waist and tie in the back.
Cutting:
Once I had my yardage of both types of black tulle, I laid them on the floor and cut them to the appropriate length of L. I ended with 8 panels of shiny and 8 panels of scrubbie.
Sewing:
I needed to know how wide to make each panel. I took my W measurement and divided it by 4 in order to get the width that each panel needed to be gathered and become.
for every panel: W/4 = required width of panel
example: 30/4 = 7.5 inches
I chose to sew my panels by hand one at a time. I unfolded each panel of fabric and used a running stitch across the width of the panel about a half inch from the edge. Once at the end of the fabric, I pulled the thread and gathered the fabric to the required inches. In my case, each panel needed to be gathered and become 7.5 inches wide.
.jpg)
Once I had all 16 panels sewed to 7.5 inches in gathered length, I started sewing them onto a 1 inch black satin ribbon, one layer at a time. I started stitching a layer of scrubbie tulle first. Each panel going on side by side, end to end. I did not bother sewing the length of the panels together because I figured the dress would be so full, no one would not notice that it had individual panels. After a layer of scrubbie tulle, I sewed on the next layer of scrubbie tulle right on top. Then a layer of shiny mesh and then the last layer of shiny mesh. (technically, I probably could have sewed all four layers per panel at once, but I chose not too because I wasn't sure how full I wanted it to be. Two layers of structure with the scrubbie and two layers of softness with the shiny was perfect.)
Now all four layers were on a black satin ribbon. It was time for the waist band ribbon.
I took the 3 inch black grosgrain ribbon and folded in in half over all four layers. I sewed the sandwiched pieces together. Voala! A tulle skirt.
Lights:
I tested the fairy lights to ensure they all worked and were indeed the same color. Some were a more yellow light and some were a more blue. For the fullness and size of my skirt and the length of the fairy lights, I determined that I wanted 3 sets of lights.
So, I took left over scrubbie mesh and cut 3 large squares. I folded the squares in half hot dog style and then in half again hamburger style leaving the back a little taller than the front. I then sewed up the two sides and the bottom to form a pocket. Worrying the batteries would show through the pockets, I cut rectangles of black felt to line the inside pocket to cover the battery packs from the front of the dress. I then determined where I my waist I wanted the battery packs so that I could still sit comfortably. I hand sewed the top of each pocket to the inside waist band of the skirt. I then put the battery packs in each of the pockets
I put the skirt on my dress form, turned on the fairy lights, and lifted up the 2 layers of shiny tulle. Once that was out of the way, I was able to weave the fairy lights in and out of the two layers of scrubbie tulle. No sewing involved. The scrubbie holes were large enough for the fairy lights to weave through but still stay in place. I did not weave in a certain pattern, just to where I thought it was visually appealing.


.jpg)


